# 一个豆瓣电影 MovieDob 网页版
# 前言
前面已经写了一个 一个豆瓣电影小程序 的微信小程序;现在这个是 React+Typescript 的网页版,基于 这里 的修改版,antd 换为 antd-mobile
# 1、函数组件+Hooks
# 1.1 特点
- 简单功能的开发很省代码;
useMemo可以当作computed使用,useEffect可以实现watch的效果,也可以有mount/unmount的效果,还有其他方便的东西- 一些周边的工具也相应更新了 类似
Hooks的useXXX函数,如react-router的useParams,redux也有一些新的 API 如useSelector等 useRef存储变量,修改不会导致render,useState也不会改变他的值,可以在渲染周期间保存变量- 自定义
Hooks可以较大程度复用代码,如下useFetchData等 - 其他的使用技巧,用得多了就熟能生巧了
# 1.2 一些情况的处理
# 组件销毁前,请求还在继续~
类组件的处理方式:
在组件
unmount前 重写 this.setState 方法public componentWillUnmount() { // 组件销毁后,不操作数据 this.setState = () => {}; }Hooks 的处理方式
使用一个标记如:let isDestroyed = false,useEffect 回调函数中返回一个函数,在这个函数内修改这个标记 isDestroyed = true,然后请求结束时,如果 isDestroyed === false 才调用 setState 的方法
封装一个 useFetchData
// src/utils/useFetchData.tsx
import * as React from 'react';
import { AxiosResponse } from 'axios';

const {useEffect, useState} = React;

type Props = Promise<AxiosResponse<any>>;

/**
 * 请求数据函数的封装
 * @param fetchFn 封装好的 axios 请求函数,看 src/api
 */
const UseFetchData = (fetchFn: Props) => {
  const [isLoading, setIsLoading] = useState<boolean>(false);
  const [isError, setIsError] = useState<boolean>(false);
  const [resData, setResData] = useState<any>();

  useEffect(() => {
    let isDestroyed = false;

    const getData = async () => {
      setIsLoading(true);
      try {
        const res = await fetchFn;
        if (!isDestroyed) {
          setIsLoading(false);
          setResData(res);
        }
      } catch(err) {
        setIsError(true);
      }
    };

    getData();

    return () => {
      isDestroyed = true;
    };
  }, []);

  return {
    isLoading,
    isError,
    resData
  };
};

export default UseFetchData;
UseFetchData 使用:
// src/views/movie-detail/index.tsx
  const { isLoading, resData } = UseFetchData(getMovieDetail({id: params.id}));

  useEffect(() => {
    if (resData) setMovieInfo(resData);
  }, [resData]);

// getMovieDetail 函数是这样的:
// src/api/movie.ts
export function getMovieDetail({ id = '' } = {}) {
  return axios.get('/v2/movie/subject/'+id);
}
# 监听滚动
- Class 组件写法:
// src/views/home/index.tsx
  constructor(props: IProps) {
    super(props);
    this._onScroll = this._onScroll.bind(this);
  }

  public componentDidMount() {
    window.addEventListener('scroll', this._onScroll);
  }

  public componentWillUnmount() {
    window.removeEventListener('scroll', this._onScroll);
  }
函数+Hooks 写法:
- **useEffect 第二个参数为传空数组[]: 在
_onScroll内useState只会起作用一次!!!很诡异(Capture Value ?)。。。 一开始我是这么写的, - useEffect 第二个参数不传: 这样就可以,但是这样又会导致 每次 state 变化 执行一次,官方的 Demo 写法好像就是这样的。。。不知道这是不是正确的姿势!?!
可以在 这里 看看
- **useEffect 第二个参数为传空数组[]: 在
# 2、列表 keep-alive
由于 React 没有像 Vue 提供的 <keep-alive></keep-alive> 组件,要实现这个就自己动手来,这个在 这里 已经大概说了一下
# 2.1 路由的写法
这里的 AuthRoute 是基于官方 Route 的封装;主要就是使用 Route 的 render 方法 渲染列表页,然后详情页是作为 children 挂在列表页下面的
// src/routes/home.tsx
import AuthRoute from '@/routes/auth-route';
import * as React from 'react';
import Loadable from '@loadable/component';

const Home = Loadable(() => import('@/views/home'));
const SearchList = Loadable(() => import('@/views/search-list'));

// home
export default [
  <AuthRoute
    key="search"
    path="/search"
    render={() => (
      <SearchList>
        <AuthRoute
          exact={true}
          path="/search/movie-detail/:id"
          component={Loadable(() => import('@/views/movie-detail'))}
        />
      </SearchList>
    )}
  />,
  <AuthRoute
    key="home"
    path="/"
    render={() => (
      <Home>
        <AuthRoute
          exact={true}
          path="/movie-detail/:id"
          component={Loadable(() => import('@/views/movie-detail'))}
        />
      </Home>
    )}
  />
]
# 2.2 列表组件的处理
# 2.2.1 详情页组件
- 在详情页路由时,隐藏列表页的内容
this.props.children就是上面<Home>里面的东西
// src/views/home/index.tsx

  public isDetailPage() {
    return this.props.location.pathname.includes("/movie-detail/");
  }

  public render() {
    const {
      movieLineStatus,
      isLoading,
      movieLine,
      movieComing,
      movieTop250,
      isTop250FullLoaded
    } = this.state;

    return (
      <div className={`${styles.home}`}>
        {!this.isDetailPage() &&
          <HeaderSearch onConfirm={(val) => this.onConfirm(val)} />
        }
        <div
          className={`${styles['home-content']} center-content`}
          style={{display: this.isDetailPage() ? 'none' : 'block'}}
        >
          <section className={styles['movie-block']}>
            <div className={styles['block-title']}>
              <span className={`${styles['title-item']} ${movieLineStatus === 0 && styles['title-active']}`}
                onClick={() => this.movieStatusChange(0)}
              >院线热映</span>
              <span className={`${styles['title-item']} ${movieLineStatus === 1 && styles['title-active']}`}
                onClick={() => this.movieStatusChange(1)}
              >即将上映</span>
            </div>

            {movieLineStatus === 0 ? (
              <MovieItem movieList={movieLine} toDetail={(id: string) => this.toDetail(id)} />
            ) : (
              <MovieItem movieList={movieComing} toDetail={(id: string) => this.toDetail(id)} />
            )}
          </section>

          <MovieTop250
            isLoading={isLoading}
            movieTop250={movieTop250}
            toDetail={(id: string) => this.toDetail(id)}
          />

          {isLoading && <Loading />}

          <TopBtn />

          {isTop250FullLoaded && <div className={styles.nomore}>没有更多数据了~</div>}
        </div>

        {/* detial */}
        { this.props.children }
      </div>
    )
  }
# 2.2.2 滚动位置恢复
- 在列表页路由下,监听滚动事件,保存滚动条位置
scrollTop; - 进入详情页路由时,移除滚动事件监听
- 回到列表页面时,恢复滚动条位置
// src/views/home/index.tsx
  constructor(props: IProps) {
    super(props);
    this._onScroll = this._onScroll.bind(this);
  }

  public componentDidMount() {
    this._getMovieLine();
    this._getMovieTop250();
    getMovieTop250All();

    this.props.history.listen(route => {
      this.onRouteChange(route);
    })

    window.addEventListener('scroll', this._onScroll);
  }

  public componentWillUnmount() {
    // 组件销毁后,不操作数据
    this.setState = () => {};
    window.removeEventListener('scroll', this._onScroll);
  }

  // 监听路由变化
  public onRouteChange(route: any) {
    // 首页
    if (route.pathname === '/') {
      const { scrTop } = this.state;
      window.addEventListener('scroll', this._onScroll);
      // 恢复滚动条位置
      this.setScrollTop(scrTop);
    }
    // 详情页
    if (route.pathname.includes("/movie-detail/")) {
      // 重置滚动条位置
      this.setScrollTop(0);
      window.removeEventListener('scroll', this._onScroll);
    }
  }

  // 设置滚动条位置
  public setScrollTop(top: number) {
    document.body.scrollTop = top;
    document.documentElement.scrollTop = top;
  }

  public _onScroll() {
    const winHeight = window.innerHeight;
    const srcollHeight = document.documentElement.scrollHeight;
    const scrollTop = document.body.scrollTop || document.documentElement.scrollTop;
    const toBottom = srcollHeight - winHeight - scrollTop;

    if (toBottom <= 200) {
      this._getMovieTop250({ start: this.state.currentPage*10 });
    }
    if (this.props.location.pathname === '/') {
      this.setState({ scrTop: scrollTop });
    } else {
      window.removeEventListener('scroll', this._onScroll);
    }
  }
# 3、代码预加载 prefetch
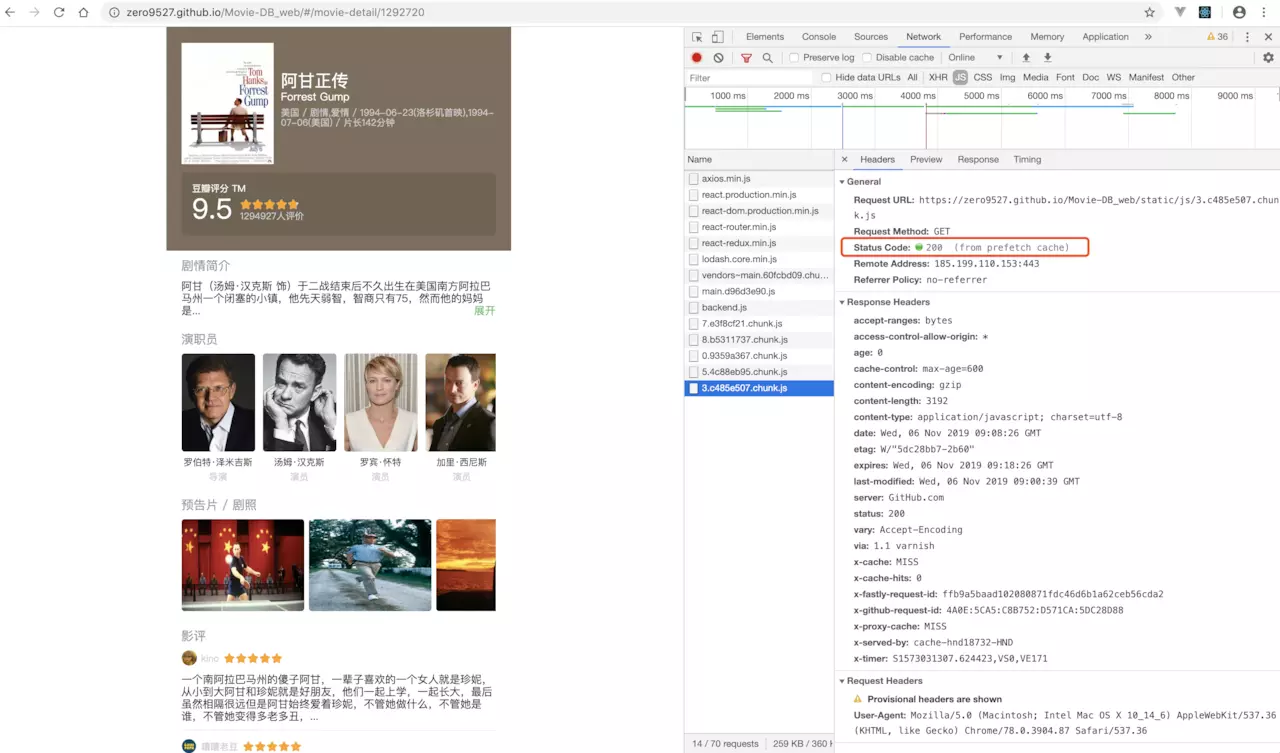
webpack v4.6.0+ 的功能,文档
在首页路由,浏览器空闲时下载代码,从首页进入详情页时直接从缓存中读取,没有白屏

使用如:
const Detail = Loadable(() => import(/* webpackPrefetch: true */ '@/views/movie-detail'));
路由:
// src/routes/home.tsx
import AuthRoute from '@/routes/auth-route';
import * as React from 'react';
import Loadable from '@loadable/component';

const Home = Loadable(() => import('@/views/home'));
const SearchList = Loadable(() => import('@/views/search-list'));
const Detail = Loadable(() => import(/* webpackPrefetch: true */ '@/views/movie-detail'));

// home
export default [
  <AuthRoute
    key="search"
    path="/search"
    render={() => (
      <SearchList>
        <AuthRoute
          exact={true}
          path="/search/movie-detail/:id"
          component={Detail}
        />
      </SearchList>
    )}
  />,
  <AuthRoute
    key="home"
    path="/"
    render={() => (
      <Home>
        <AuthRoute
          exact={true}
          path="/movie-detail/:id"
          component={Detail}
        />
      </Home>
    )}
  />
]
# 4、定位 position: sticky;
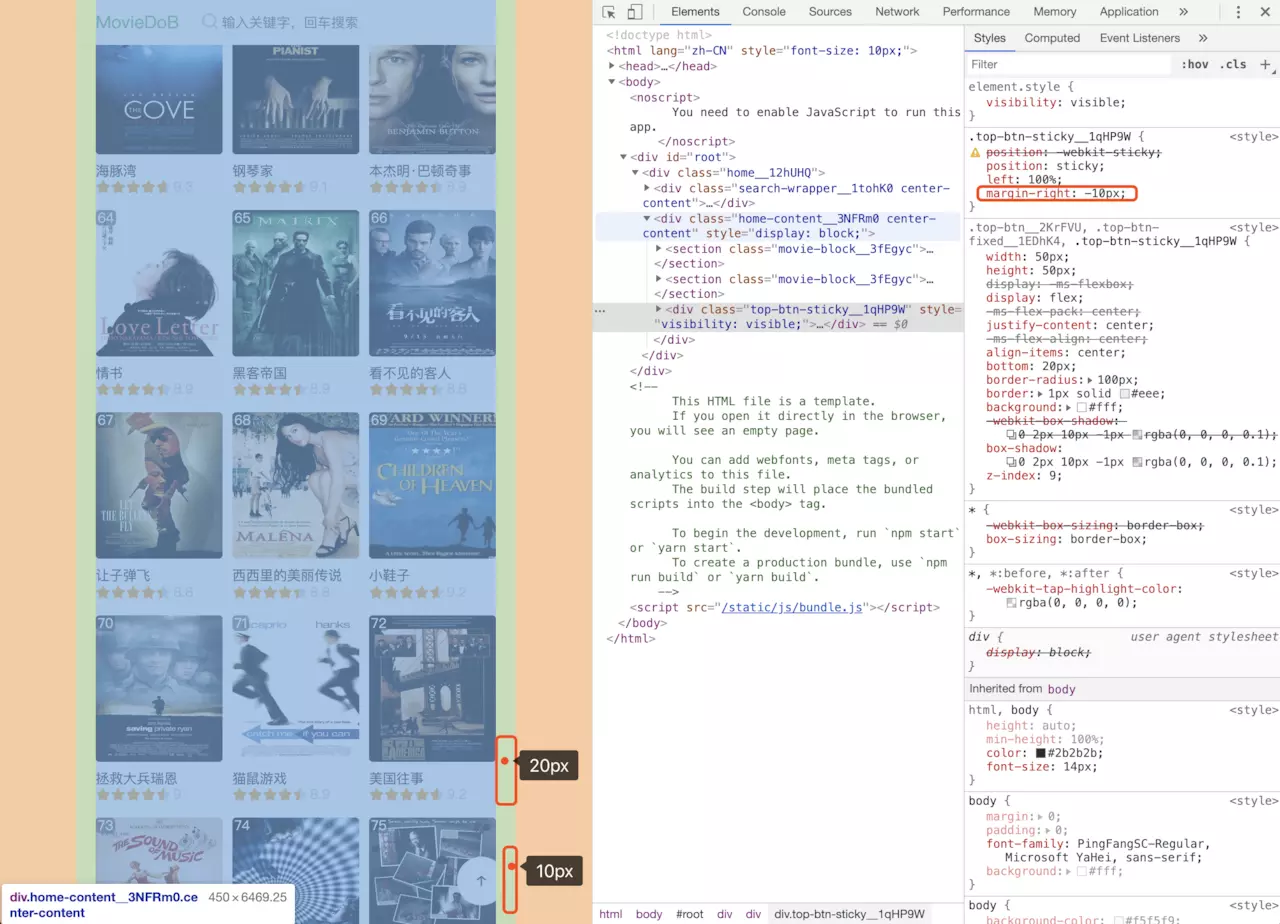
根据父元素的内容位置定位,会被限制在 padding 内,可以用 margin 负边距或者 transform 等改变位置;
# 4.1 回到顶部按钮
父元素有 padding: 10px 20px;,子元素设置 position: sticky; bottom: 0; left: 100%; ,但是会被限制在 padding 的范围内,原来是使用 bottom: 0; rihgt: 0; 的,但是 right: 0; 不起作用。。。所以用 margin-right: -10px 修改一下位置
CSS.supports('position', 'sticky')可以判断浏览器是否支持position: sticky;

<TopBtn /> 样式:
// src/components/scrollToTop/scrollToTop.scss
.top-btn {
  width: 50px;
  height: 50px;
  display: flex;
  justify-content: center;
  align-items: center;
  bottom: 20px;
  border-radius: 100px;
  border: 1px solid #eee;
  background: #fff;
  box-shadow: 0 2px 10px -1px rgba(0, 0, 0, 0.1);
  z-index: 9;
  &:active {
    background: #eee;
  }
}
.top-btn-fixed {
  position: fixed;
  right: 20px;
  @extend .top-btn;
}

.top-btn-sticky {
  position: sticky;
  left: 100%;
  margin-right: -10px;
  @extend .top-btn;
}
<TopBtn /> 组件:
// src/components/scrollToTop/index.tsx
import * as React from 'react';
import styles from './scrollToTop.scss';

const { useState, useEffect } = React;

/**
 * scrollToTop
 */
function scrollToTop() {
  const [showBtn, setShowBtn] = useState(false);

  useEffect(() => {
    const height = window.innerHeight;

    // 滚动距离大于一屏高度则显示,否则隐藏
    setShowBtn(() => (
      document.body.scrollTop >= height
      || document.documentElement.scrollTop >= height
    ));
  }, [document.body.scrollTop, document.documentElement.scrollTop]);

  function toTop() {
    if (window.scroll) {
      window.scroll({ top: 0, left: 0, behavior: 'smooth' });

    } else {
      document.body.scrollTop = 0;
      document.documentElement.scrollTop = 0;
    }
  }

  return (
    <div
      className={
        CSS.supports('position', 'sticky')
          ? styles['top-btn-sticky']
          : styles['top-btn-fixed']
      }
      style={{visibility: showBtn ? 'visible' : 'hidden'}}
      onClick={toTop}
    >
      <i className="iconfont icon-arrow-upward-outline" />
    </div>
  );
}

export default scrollToTop;
# 5、状态管理 mobx
yarn add mobx mobx-react
相对 redux 来说,mobx 概念少,写法简单使用也简单;类组件使用装饰器,函数组件使用同名函数
- @observable: 声明数据 state
- @computed: 计算属性,可以从对象或数组中取出需要的数据
- @action: 动作函数,可以直接写异步函数
- runInAction: 注意没有
@,不是装饰器;在@action装饰的函数内部修改state,如下面setTimeout内修改数据 - flow: 返回一个生成器 generator 函数,用
function */yield代替async/await(这两个其实是他们的语法糖),不需要使用@action/runInAction - @inject('homeStore'): 将
homeStore注入到组件 - @observer: 函数/装饰器可以用来将 React 组件转变成响应式组件。 它用 mobx.autorun 包装了组件的 render 函数以确保任何组件渲染中使用的数据变化时都可以强制刷新组件。observer 是由单独的 mobx-react 包提供的。
其他的配置:
- 下载插件
yarn add babel-plugin-transform-decorators-legacy -D - 然后在 .babelrc: 使用装饰器
"plugins": ["transform-decorators-legacy"] - tsconfig.json: 使用装饰器
"compilerOptions": {
  "experimentalDecorators": true,
}
# 5.1 项目入口
使用 Provider 包括项目
import { Provider } from 'mobx-react';
import * as React from 'react';
import * as ReactDOM from 'react-dom';

import { Provider } from 'mobx-react';
import store from './store';
import AxiosConfig from './api';
import Router from './router';
import './index.scss';
import registerServiceWorker from './registerServiceWorker';

const Loading = () => (<div>loading...</div>);

AxiosConfig(); // 初始化 axios

ReactDOM.render(
  <React.Suspense fallback={<Loading />}>
    <Provider {...store}>
      <Router />
    </Provider>
  </React.Suspense>,
  document.getElementById('root') as HTMLElement
);

registerServiceWorker();
# 5.2 模块
// src/store/home.ts
import * as mobx from 'mobx';

// 禁止在 action 外直接修改 state
mobx.configure({ enforceActions: "observed"});
const { observable, action, computed, runInAction } = mobx;

let cache = sessionStorage.getItem('homeStore');

// 初始化数据
let initialState = {
  count: 0,
  data: {
    time: '2019-11-08'
  },
};

// 缓存数据
if (cache) {
  initialState = {
    ...initialState,
    ...JSON.parse(cache)
  }
}

class Home {
  @observable
  public count = initialState.count;

  @observable
  public data = initialState.data;

  @computed
  public get getTime() {
    return this.data.time;
  }

  @action
  public setCount = (_count: number) => {
    this.count = _count;
  }

  @action
  public setCountAsync = (_count: number) => {
    setTimeout(() => {
      runInAction(() => {
        this.count = _count;
      })
    }, 1000);
  }

  // public setCountFlow = flow(function *(_count: number) {
  //   yield setTimeout(() => {}, 1000);
  //   this.count = _count;
  // })
}

const homeStore = new Home();

mobx.spy((event) => {
  // 数据变化后触发,数据缓存
  if (event.type === 'reaction') {
    const obj = mobx.toJS(homeStore);
    sessionStorage.setItem('homeStore', JSON.stringify(obj));
  }
})

export type homeStoreType = typeof homeStore;
export default homeStore;
# 5.3 缓存
这里使用 sessionStorage,改为其他随意
数据缓存的时候,可以根据需要,匹配某些 key 去缓存,而不是所有数据;
初始化数据
数据初始化时,如果缓存中有数据,则使用缓存的数据覆盖默认数据
let cache = sessionStorage.getItem('homeStore');

// 初始化数据
let initialState = {
  count: 0,
  data: {
    time: '2019-11-08'
  },
};

// 缓存数据
if (cache) {
  initialState = {
    ...initialState,
    ...JSON.parse(cache)
  }
}
监听数据变化
监听数据变化,在
reaction后,将homeStore转化为 js 对象(只包含 state ),然后存到缓存中const homeStore = new Home(); mobx.spy((event) => { // 数据变化后触发,数据缓存 if (event.type === 'reaction') { const obj = mobx.toJS(homeStore); sessionStorage.setItem('homeStore', JSON.stringify(obj)); } })
# 5.4 模块管理输出
// src/store/index.ts
import homeStore from './home';

/**
 * 使用 mobx 状态管理
 */
export default {
  homeStore
}
# 5.5 组件使用
使用装饰器在 class 上就可以了, inject 注入对应模块,可以多次 inject;
注意
@inject('homeStore') @observer这两个的顺序,不然会有警告
// src/views/home/index.tsx
import { observer, inject } from 'mobx-react';
import { homeStoreType } from '@/store/home';
...

interface IProps extends RouteComponentProps {
  history: History,
  homeStore: homeStoreType
}

@inject('homeStore')
@observer
class Home extends React.Component<IProps> {
  ...

  public componentDidMount() {

    this.props.homeStore.setCount(2);
    console.log(this.props.homeStore.count); // 2

  }

  ...
}
# 最后
其他的没什么,项目本身也不复杂;框架用的是之前搭的 React+Typescript+antd-mobile,axios/css-modules/sass 等等这些都是标配啦;东西不多,原来的是 antd 这个是移动端所以换成 antd-mobile