# web components使用记录
# 前言
Web Components原生的组件模式,主要有customElement,shadowDom,template等,本次主要用customElement注册自定义元素组件,shadowDom存放组件内容
# 说明:
- 目前我知道的渲染后使用
web components的框架有腾讯omi, 谷歌polymer两个;omi看了一下很简单,使用jsx语法或不使用构建工具的话用h渲染函数也可以,所以自己手写试试。 - 本次试用学到的东西:
- web components使用
es6 class定义组件!!继承(extends HTMLElement或某个已有元素如HTMLButtonElement),customElement.define(tagName, className)注册组件 - 组件内样式独立(scoped);
shadow-dom是某些原生元素的实现(如video等),可以简化页面结构 - 其他:如果兼容性好的话真是不错的选择(也有pollyfill),毕竟原生还是好
- web components使用
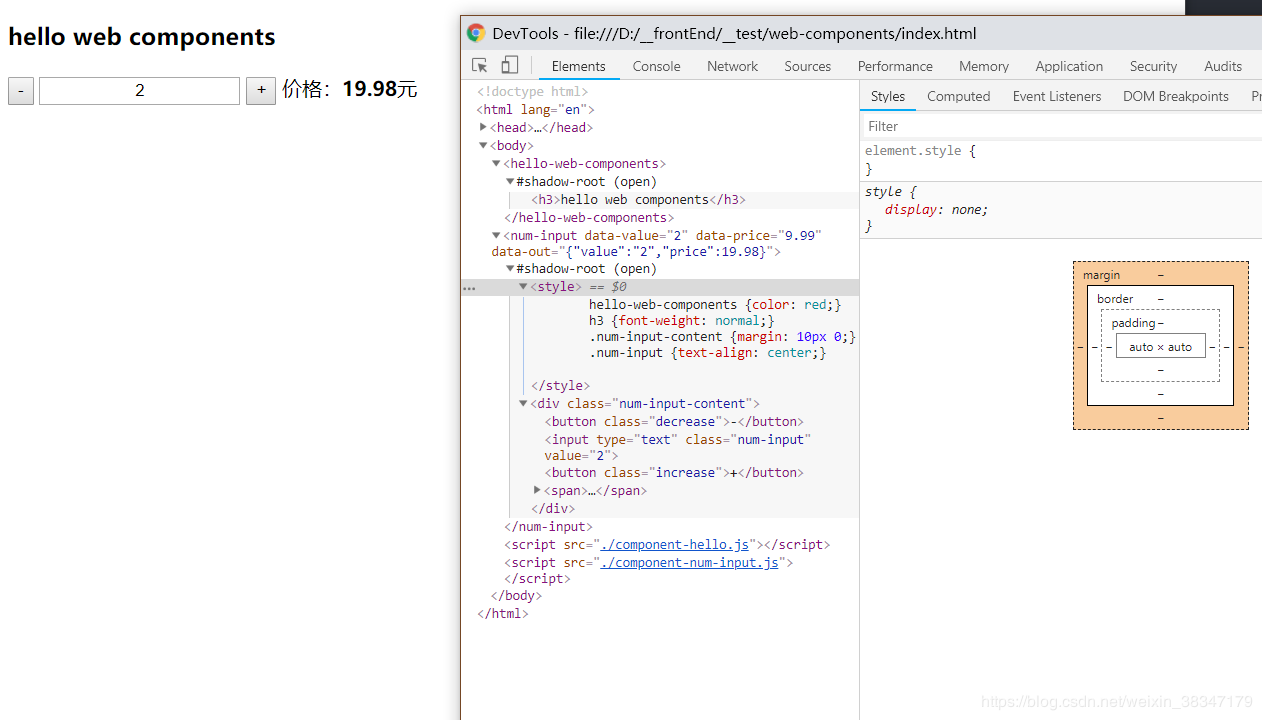
效果:(浏览器不打开shadow-dom显示的话时看不到web components里面的东西的哦,详情百度一下)

# 一、HTML:
<body>
  <hello-web-components></hello-web-components>
  <num-input
    data-value="1"
    data-price="9.99"
    data-out=""
  ></num-input>
  <script src="./component-hello.js"></script>
  <script src="./component-num-input.js"></script>
</body>
# 二、组件:
# 构造器:初始化运行的代码都放这里,包括组件样式,事件的绑定,组件内元素的生成等
constructor() {
    super();
    // this.dataset

    // 添加shadowDom
    let shadowRoot = this.attachShadow({mode: 'open'});
    let styles = `
      hello-web-components {color: red;}
      h3 {font-weight: normal;}
      .num-input-content {margin: 10px 0;}
      .num-input {text-align: center;}
    `;
    shadowRoot.innerHTML = `
      <style>${styles}</style>
      <div class="num-input-content">
        <button class="decrease">-</button>
        <input type="text" class="num-input" value="${this.dataset.value}"/>
        <button class="increase">+</button>
        <span>价格:<b class="price">${this.dataset.price}</b>元</span>
      </div>
    `;

    this.numInput = this.shadowRoot.querySelector('.num-input');  // 数量
    this.price = this.shadowRoot.querySelector('.price'); // 价格

    // 获取shadowDom下的元素
    let decrease = this.shadowRoot.querySelector('.decrease');
    let increase = this.shadowRoot.querySelector('.increase');

    // 绑定事件
    // 其实这里可以跟react一样,函数使用箭头函数声明,就不要在构造函数里面bind this了
    decrease.addEventListener('click', this.decrease.bind(this), false);
    increase.addEventListener('click', this.increase.bind(this), false);
  }
# 事件函数:与constructor同级,位于组件类的根
  // -
  decrease() {
    this.dataset.value--;
    this.update();
  }
  // +
  increase() {
    this.dataset.value++;
    this.update();
  }
  // update
  update() {
    // 更新数值
    this.numInput.setAttribute('value', this.dataset.value);
    let allPrice = this.dataset.value*this.dataset.price;
    this.price.innerText = allPrice;

    // 输出结果到:host元素
    this.dataset.out = JSON.stringify({
      value: this.dataset.value,
      price: allPrice
    });
  }
# 三、注册组件:
// 注册 <num-input></num-input> 元素
customElements.define('num-input', NumInput)
# 完整的component-num-input.js:
// component-num-input.js
class NumInput extends HTMLElement {
  constructor() {
    super();
    // this.dataset

    // 添加shadowDom
    let shadowRoot = this.attachShadow({mode: 'open'});
    let styles = `
      hello-web-components {color: red;}
      h3 {font-weight: normal;}
      .num-input-content {margin: 10px 0;}
      .num-input {text-align: center;}
    `;
    shadowRoot.innerHTML = `
      <style>${styles}</style>
      <div class="num-input-content">
        <button class="decrease">-</button>
        <input type="text" class="num-input" value="${this.dataset.value}"/>
        <button class="increase">+</button>
        <span>价格:<b class="price">${this.dataset.price}</b>元</span>
      </div>
    `;

    this.numInput = this.shadowRoot.querySelector('.num-input');  // 数量
    this.price = this.shadowRoot.querySelector('.price'); // 价格

    // 获取shadowDom下的元素
    let decrease = this.shadowRoot.querySelector('.decrease');
    let increase = this.shadowRoot.querySelector('.increase');

    // 绑定事件
    decrease.addEventListener('click', this.decrease.bind(this), false);
    increase.addEventListener('click', this.increase.bind(this), false);
  }
  // -
  decrease() {
    this.dataset.value--;
    this.update();
  }
  // +
  increase() {
    this.dataset.value++;
    this.update();
  }
  // update
  update() {
    // 更新数值
    this.numInput.setAttribute('value', this.dataset.value);
    let allPrice = this.dataset.value*this.dataset.price;
    this.price.innerText = allPrice;

    // 输出结果到:host元素
    this.dataset.out = JSON.stringify({
      value: this.dataset.value,
      price: allPrice
    });
  }
}

// 注册 <num-input></num-input> 元素
customElements.define('num-input', NumInput)